Linux Installation
The following is about how to install Pneuron in a Linux environment.
Pneuron Installation Introduction
This manual is intended as a reference guide for the correct installation of the Pneuron Application Suite, version 2.0 and the required third-party components. The instructions assume the person performing the installation is experienced in the administration of databases and other server-side applications.
Prerequisites
The Pneuron Applications Suite requires that appropriate hardware and third party applications have been installed prior to installing the Pneuron applications. The customer must configure the hardware and set up the environment before installing the Pneuron applications.
Minimum Hardware Requirements
For installation of the Pneuron Application Suite, Pneuron recommends the following minimum system requirements:
- 16 GB Memory
- 50 GB Hard disk
- 2-Quad core CPUs
The requirements above are typical of a Pneuron test environment deployment.
Production Hardware Requirements
A typical production installation would consist of a 3-tiered environment with the following minimum configuration.
Pneuron server
- 16 GB Memory
- 50 GB Hard disk
- Quad core Intel CPU
Web server
- 16 GB Memory
- 50 GB Hard disk
- Quad core Intel CPU
Database Server
- 32 GB Memory
- 50 GB Hard disk. Disk size may need to increase if third party databases are deployed.
- 2-Quad core Intel CPUs
Please note that these values are a set of minimum recommendations. As more information about the implementation becomes available, a better understanding of hardware requirements will evolve. Actual requirements will vary based on your system configuration, message or transaction volume and the type and complexity of the Pneuron networks.
Required Software Components
The following table shows the list of required components that the customer must install in the environment before the Pneuron applications are installed.
| Required Component | Pneuron Supported Components |
|---|---|
| Web Server | Apache Tomcat, JBoss, IBM WebSphere |
| Java (JDK) | Oracle Sun JDK Version 1.8.x |
| Database | MySQL 5.0 + Oracle 10g + SQL Server 2008R2 + |
| Database Driver | sqljdbc41.jar - MS SQL Server ojdbc6.jar - Oracle mysql-connector-java-5.1.7-bin.jar - MySQL |
| GUI Database Access Tool | MS SQL Server Management Studio Oracle SQL Developer/Toad/dbForge Studio MySQL Query Browser |
| Web Browser | IE 10 + Firefox 50 + Chrome |
*Candidates for Future Releases
Optional Components
The following table shows additional components that may be required, depending on the Pneuron application functionality the customer has licensed. These components must be installed in the customer’s environment before the Pneuron applications are installed.
| Component | Required if... | Pneuron Supported Components |
|---|---|---|
| Java Message Service (JMS) | Customer wants to use clustered Pneuron networks | Active MQ 5.7/5.9, IBM WebSphere MQ 7.1* |
Pneuron Web Application Description
The following table describes the web applications contained in the Pneuron Application Suite.
| Web Application | Description |
|---|---|
| Pneuron Design Studio | Enables configuration of Pneurons, Pneuron Networks, data sources, data acquisition, business rules, intelligence analytics and supporting artifacts |
| Pneuron Administration | Enables configuration of user permissions, roles, module access and data source access as well as participating hosts and realms. |
| Pneuron Enterprise Control Manager (ECM) | Enables users to configure and visualize intelligence and analytics, and interact directly with targeted networks in Pneuron Design Studio. |
Access to the Customer Environment
Prior to performing the installation of the Pneuron applications in the customer environment, the following data must be available:
- Database host server name
- User name and password of the user associated with the Pneuron configuration database
- Any other access credentials required for installation. For example, administrator credentials for the servers.
Installing Pneuron in a Linux Environment
The following steps assume the Pneuron installation directory is /opt/pneuron. This can be changed to comply with customer standards.
-
Copy the Pneuron installation media contents to a local drive and navigate to that directory. The directory will contain the files shown:
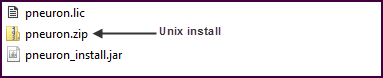
-
Transfer the Pneuron installation file,
pneuron.zip, to the UNIX server. -
Create the Pneuron installation directory
mkdir /opt/pneuron -
Unzip
pneuron.zipto the local drive. This will create a kit directory shown below:
-
suto the root user - Change tot he kit directory
- Run the
install.shscript and provide appropriate responses to the following questions:
Default answers are shown in brackets. Modify as required.
Enter the path to JAVA_HOME [/opt/java]
   Enter the path to install the Pneuron server [/opt/pneuron]
   Enter user name the Pneuron server should run as [root]
   Enter group name the Pneuron server should run as [root]
The Pneuron application will be installed in the specified directory.
Note: If a user other than root is used, modify
install.shby commenting the following lines:
if [ "$USER" != "root" ]; then
    echo "ERROR - You must run this script as root"
    exit
fi
The directories created by the installation are shown below:
| Install Directory | Description |
|---|---|
| Admin | The Pneuron Administration application war file |
| bin | Shell/batch scripts used to run the server |
| cache | Temporary files created by specific Pneurons |
| cfg | Property/configuration files |
| db | Database schema files in XML format |
| DS | The Pneuron Design Studio application war file |
| ECM | The Enterprise Control Manager application war file (if purchased by customer) |
| images | Legacy images |
| javadoc | Java documents for the com.pneuron package |
| Javadoc.srx | Java documents for the com.softwarerx package |
| jetty | Servlet/web engine for Pneuron web services |
| keys | Pneuron encryption keys |
| lib | Pneuron and third-party .jar files |
| logs | Pneuron log files |
Creating the Pneuron Web Directories
You must create Pneuron directories within the Tomcat directory structure and manually deploy the Pneuron applications to the Tomcat directory.
These steps are performed on the web server.
To create the Pneuron directories:
-
Navigate to the
webappsdirectory under the Tomcat home directory. For example/opt/tomcat/webapps/opt/tomcatis the Tomcat home -
Create a directory in the
webappsdirectory calledds. -
Create a directory in the
webappsdirectory calledadmin. -
If the ECM module was licensed, create a directory in the
webappsdirectory calledecm.
Deploying the Pneuron Web Applications
There are .war files in each Pneuron application directory that must be unzipped into their respective webapps directories. To populate the Pneuron webapps directories:
-
Open a terminal window and execute the following commands.
-
cd /[Tomcat home]/webapps/dsto navigate to thedsdirectory. -
jar -xvf /opt/pneuron/DS/designstudio-web-1.0-SNAPSHOT.warand press Enter to unpack the.warfile into thedsfolder. -
cd /[Tomcat home]/webapps/adminto navigate to theadmindirectory. -
jar -xvf /opt/pneuron/Admin/pneuronadmin-web-1.0-SNAPSHOT.warand press Enter to unpack the.warfile into theadminfolder. -
If the ECM module was licensed, perform step 7 and 9.
-
cd /[Tomcat home]/webapps/ecmto navigate to theecmdirectory. -
jar -xvf /opt/pneuron/ECM/dashboards-web-1.0-SNAPSHOT.warand press Enter to unpack the.warfile into theecmfolder.
JDBC Driver Installation
Copy the appropriate JDBC driver to the following directories:
/opt/pneuron/lib
/[Tomcat Home]/lib
Copying the Pneuron License File
The Pneuron installation media contains the Pneuron license file. This file, pneuron.lic, controls how many concurrent users can access the Pneuron system as well as which Pneurons are available.
Copy pneuron.lic to the Pneuron root folder, \opt\pneuron
Configuring the Pneuron Environment
After the Pneuron installation process has completed, you must configure the Pneuron environment by creating the database, defining the data sources, populating the schema tables and configuring the Pneuron server host.
Creating the pneuron_config Database
-
From a command prompt, change to the Pneuron installation directory and type
bin/setupand press Enter.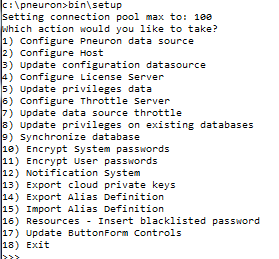
-
Type
1and press Enter to configure the Pneuron data source.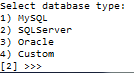
-
Type the appropriate number for the database type and press Enter. Enter the appropriate database details when prompted. The example below assumes MS SQL Server as the target database.
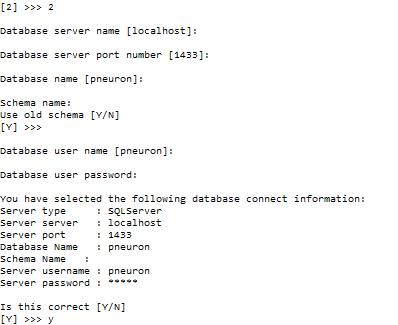
-
Confirm your selections, type
Yand press Enter. The output generated by the database population is displayed.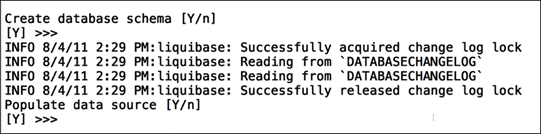
-
Type
Yto confirm that you want to create the database schema and press Enter. This will run a script to create the database tables required for the Pneuron applications. -
Type
Yto confirm that you want to populate the data source and press Enter. This configures thepneuron_configdata source. -
Type
2and press Enter to configure the Pneuron host.
-
Type the Pneuron server name and port number (to connect to via web services) and press Enter. The default port number is
8888. -
Type
4and press Enter to configure the Pneuron license server.
-
Type the server name and port number (to connect to via web services) and press Enter. The default port number is
8888. In a Pneuron deployment that has a single Pneuron server, the Pneuron host and Pneuron license server are the same machine and port. -
Type
18and press Enter to exist.
Modifications to softwarerx.properties
Depending on the configuration of the Pneuron environment, changes may need to be performed to the file /pneuron/cfg/softwarerx.properties. This file was created and populated in the previous steps. softwarerx.properties can be modified using a text editor. These modifications can also be performed using the Pneuron Administration application (Security-Properties Management).
Modification 1:
If the ECM has been installed and the web server is on a node separate from the Pneuron server:
Locate the line: cordaextserver=http\://localhost\:2001
Replace localhost with the <hostname/IP> address of the web server.
Modification 2:
If the ECM has been installed and the web server is on a node separate from the Pneuron server:
Locate the line: repositoriesecmexternalpath=http\://localhost\:2001
Replace localhost with the <hostname/IP> address of the web server.
Starting the Pneuron Server and web server
After the installation process has been completed, start the Pneuron server and web server.
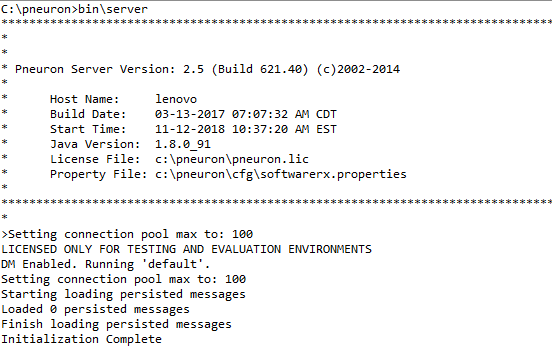
Starting the Pneuron Server
From a command prompt, change directory to the Pneuron installation directory and type bin/server and press Enter. The message Initialization Complete will appear, indicating that the Pneuron server has been started.
Stopping the Pneuron Server
If the Pneuron server had been started from a command prompt window, issue the quit command in the Pneuron server command window. A list of all of the running Pneurons will display as they are shut down.
The Shutdown Complete message indicates the Pneuron server has terminated processing.
Starting the Web Server
To start the web server, refer to the web server documentation. As an example, the following procedures will start the Tomcat server in a Linux environment.
-
From a command line, change directory to the top-level directory of the Tomcat server.
cd [TomcatHome]for examplecd /opt/tomcat -
Invoke the batch file to start the Tomcat server
bin/catalina run
The Tomcat server will start and output will be sent to the command prompt window.
Stopping the Web Server
To stop the web server, refer to the web server documentation. As an example, the following procedures will stop the Tomcat server in a Linux environment.
- To stop the Tomcat server issue a
Ctrl-Cand typeyat the promptTerminate batch job (Y/N)?
Sample Linux Shell Script to Start All Applications
A script can be created to start the applications required for Pneuron. Modify the directories as required. Contents of the shell script:
Start the Pneuron Server
cd /opt/pneuron/nohup bin/server -D > logs/server.log 2> logs/error.log &cd /opt/tomcat/bin
Start web server
nohup ./catalina.sh run >/opt/tomcat/logs/catalina.log 2>/opt/tomcat/logs/catalina_error.log &
Upgrading Pneuron in a Linux Environment
It is the customer’s responsibility to ensure they have a suitable backup strategy in place for their Pneuron system. Pneuron is not responsible for the customer’s backup strategy or system.
Updating the Pneuron Install
Prior to upgrading the application, insure the Pneuron server and web server have been stopped.
Updating Pneuron to the latest version is a similar process to the initial installation.
-
Copy the Pneuron installation media contents to a local drive and navigate to that directory.
-
Unzip
pneuron.zipto the local drive. This will create a kit directory shown below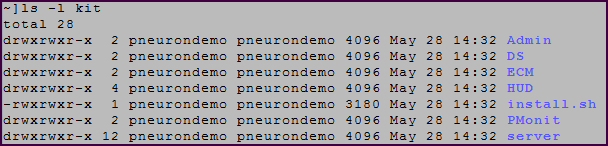
-
suto the root user -
Change to the kit directory
-
Run the install.sh scrip and provide appropriate responses to the following questions:
Default answers are shown in brackets. Modify them to match the current Pneuron installation.
Enter the path to JAVA_HOME [/opt/java]
   Enter the path to install the Pneuron server [/opt/pneuron]
   Enter user name the Pneuron server should run as [root]
   Enter group name the Pneuron server should run as [root]
If prompted, confirm to overwrite the current Pneuron installation.
Note: If a user other than root is used, modify
install.shby commenting the following lines:if [ "$USER" != "root" ]; then echo "ERROR - You must run this script as root" exit fi
Updating the Pneuron Webapp Directories
The Pneuron webapp directories that were created during the initial installation need to be updated with the latest Pneuron application. These steps are performed on the web server.
There are .war files in each Pneuron application directory that must be unzipped into their respective webapp directories.
To populate the Pneuron webapp directories:
-
Open a command prompt and execute the following commands.
-
cd /[TomcatHome]/webapps/dsto navigate to thedsdirectory. -
Delete all folders under the
dsdirectory -
jar -xvf /opt/pneuron/DS/designstudio-web-1.0-SNAPSHOT.warand press Enter to unpack the.warfile into thedsfolder. -
cd /[TomcatHome]/webapps/Adminto navigate to theAdmindirectory. -
Delete all folders under the
Admindirectory -
jar -xvf /opt/pneuron/Admin/pneuronadmin-web-1.0-SNAPSHOT.warand press Enter to unpack the.warfile into theAdminfolder. -
If the ECM module was licensed, perform step 9, 10 and 11.
-
cd /[Tomcat home]/webapps/ecmto navigate to theecmdirectory. -
Delete all folders under the
ecmdirectory -
jar -xvf /opt/pneuron/ECM/dashboards-web-1.0-SNAPSHOT.warand press Enter to unpack the.warfile into theecmdirectory. -
Type
Exitand press Enter to exit the command prompt.
Restart the Applications
Restart the Pneuron server and web server.